You’ve just redesigned your website. The URLs are cleaner, the structure makes more sense, and everything looks perfect. Then you check Google Search Console and watch your traffic plummet by 40% overnight.
This exact scenario plays out hundreds of times every day across the web. Site owners change URLs without implementing proper redirects, and search engines treat those pages as if they vanished into thin air. Years of SEO work disappears because of a simple technical oversight.
The good news? A 301 redirect is your insurance policy against this disaster. It’s the difference between maintaining your hard-earned search rankings and starting from scratch. But here’s what nobody tells you: most people implement 301 redirects incorrectly, which creates a whole new set of problems.
Let me show you exactly how to do this right.
What Is a 301 Redirect and Why Should You Care
A 301 redirect is a permanent redirect from one URL to another. When someone (or a search engine bot) tries to access the old URL, the server automatically sends them to the new location. The “301” is the HTTP status code that tells browsers and search engines: “This page has moved permanently to a new address.”
Think of it like forwarding mail after you move houses. The post office doesn’t just throw your letters away because you changed addresses. They send them to your new location. That’s exactly what a 301 redirect does for your web pages.
According to a 2024 study by Ahrefs, websites that implement proper 301 redirects retain approximately 90-99% of their link equity compared to pages that simply disappear. Without redirects, you lose all the ranking power those URLs accumulated over time.
Here’s the critical part: search engines treat different redirect types differently. A 301 tells Google “this is permanent, transfer all the ranking signals to the new page.” A 302 redirect says “this is temporary, keep checking the old URL.” Use the wrong one, and you’re telling search engines to ignore your new pages.
When You Actually Need a 301 Redirect
Not every URL change requires a redirect. Understanding when to implement one saves you time and prevents unnecessary server overhead.
You absolutely need a 301 redirect when:
- Changing your domain name. Moving from oldsite.com to newsite.com without redirects means abandoning all your search rankings and inbound links.
- Restructuring your URL hierarchy. If you’re moving from example.com/blog/post-name to example.com/resources/post-name, every single changed URL needs a redirect.
- Deleting pages that receive traffic. Got a product page you’re discontinuing but it ranks for valuable keywords? Redirect it to the most relevant alternative page.
- Switching from HTTP to HTTPS. This is non-negotiable in 2025. Google has confirmed that HTTPS is a ranking signal, and sites without SSL certificates see warning messages in browsers.
- Consolidating duplicate content. If you have multiple pages targeting the same topic, redirect the weaker ones to your strongest page.
- Fixing broken links from external sites. Someone linked to your page with a typo in the URL? Set up a redirect so you don’t lose that referral traffic.
You don’t need a 301 redirect when:
- Creating new content with a new URL that never existed before
- Pages that never received traffic or rankings
- Internal test pages that were never indexed
- Temporary page removals where you plan to restore the original URL
Research from Moz indicates that 84% of websites have at least one redirect chain or loop, which significantly slows down page load times and confuses search engines. Only implement redirects when necessary, and always test them thoroughly.
How to Implement a 301 Redirect on Different Platforms
The method you use depends entirely on your server configuration and content management system. Let me break down the most common scenarios with actual code you can use right now.
Method 1: WordPress Using a Plugin
WordPress powers 43.5% of all websites according to W3Techs data from 2024, making this the most relevant method for the majority of site owners.
Using Rank Math (Recommended):
- Go to Rank Math > Redirections in your dashboard
- Click “Add New” button at the top
- In “Source URLs” field, enter your old URL (example: /old-page)
- In “Destination URL” field, enter your new URL
- Leave “Redirection Type” as 301 (default)
- Click “Add Redirection”
Rank Math includes redirections in the free version and tracks 404 errors automatically. You can bulk import redirects via CSV if you’re migrating hundreds of URLs.
Using Yoast SEO Premium:
- Navigate to SEO > Redirects in WordPress dashboard
- Type your old URL in the “Old URL” field
- Enter the new destination in the “URL” field
- Select “301 Moved Permanently” from the dropdown
- Click “Add Redirect”
Note: Yoast redirects only work in the Premium version ($99/year). The free version doesn’t include this feature.
Alternative Free Option (Redirection Plugin):
- Install “Redirection” plugin from WordPress repository
- Go to Tools > Redirection
- Enter old URL in “Source URL”
- Enter new URL in “Target URL”
- Confirm it says “301 – Moved Permanently”
- Click “Add Redirect”
All three options work at the WordPress level, so no .htaccess editing required.
Method 2: Apache Server Using .htaccess
If your website runs on Apache (check with your hosting provider if you’re unsure), you can implement redirects directly in your .htaccess file. This method is faster than plugins because it handles redirects at the server level before WordPress even loads.
Redirecting a single page:
Redirect 301 /old-page.html https://yoursite.com/new-page
Redirecting an entire directory:
Redirect 301 /old-directory https://yoursite.com/new-directory
Redirecting to a new domain:
RewriteEngine On
RewriteCond %{HTTP_HOST} ^oldsite\.com$ [OR]
RewriteCond %{HTTP_HOST} ^www\.oldsite\.com$
RewriteRule (.*)$ https://newsite.com/$1 [R=301,L]
Important: The .htaccess file lives in your website’s root directory. Access it via FTP or your hosting control panel’s file manager. Make a backup before editing it. One syntax error can break your entire site.
Method 3: Nginx Server Configuration
Nginx handles approximately 33% of active websites according to Netcraft’s 2024 survey. The redirect syntax differs significantly from Apache.
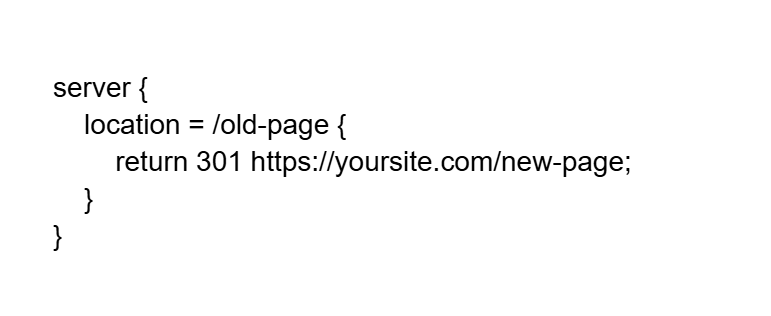
Single page redirect:
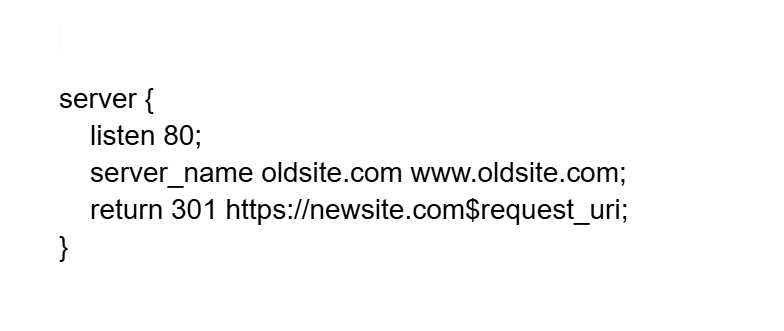
Domain-wide redirect:
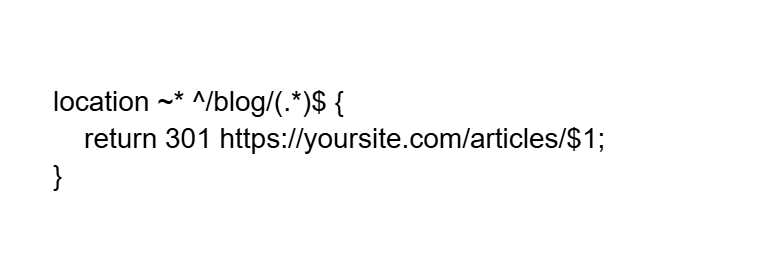
Pattern-based redirect:
Nginx configuration files are typically located at /etc/nginx/nginx.conf or /etc/nginx/sites-available/. You’ll need SSH access and root permissions to edit these files. After making changes, test the configuration with nginx -t and reload with systemctl reload nginx.
Method 4: CloudFlare Page Rules
If you use CloudFlare (and you probably should for performance and security), you can implement redirects through Page Rules without touching server files.
Navigate to your CloudFlare dashboard, select your domain, go to Rules > Page Rules, and create a new rule:
- URL pattern: yoursite.com/old-page
- Setting: Forwarding URL
- Status Code: 301 – Permanent Redirect
- Destination URL: https://yoursite.com/new-page
CloudFlare’s free plan includes 3 page rules. For complex redirect scenarios, you’ll need a paid plan or use CloudFlare Workers for programmatic redirects.
Method 5: JavaScript Redirects (Last Resort Only)
JavaScript redirects should be your absolute last option. Search engines can process them, but they’re slower and less reliable than server-side redirects.
<script>
window.location.replace(“https://yoursite.com/new-page”);
</script>
Or using the meta refresh tag:
<meta http-equiv=”refresh” content=”0; url=https://yoursite.com/new-page”>